 |
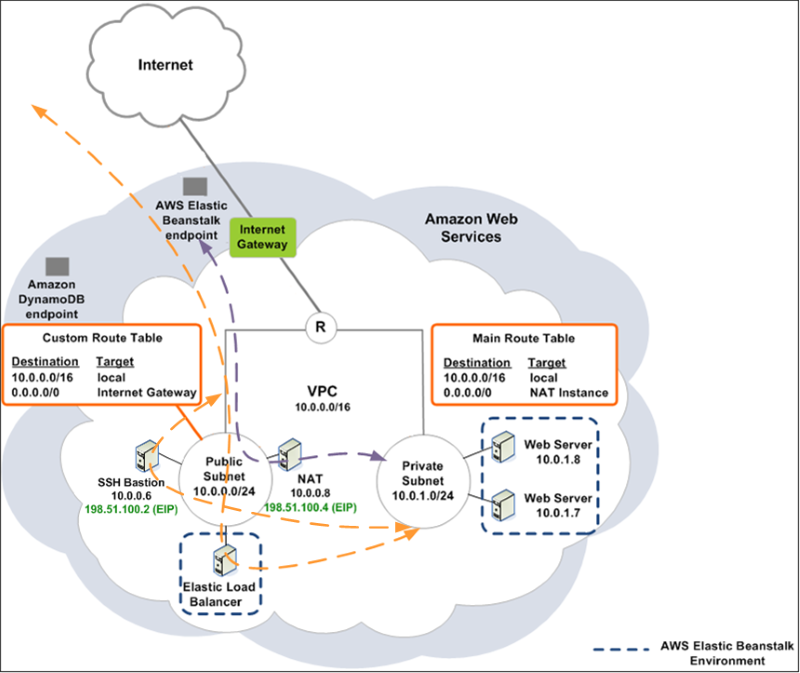
| Logical diagram showing Elastic Beanstalk in a VPC From http://docs.aws.amazon.com/elasticbeanstalk/latest/dg/AWSHowTo-vpc-bh.html |
The key point came when the client asked about all the other 'ancillary' instances surrounding the environment, i.e.
- Internet Gateway
- Bastion Host
- NAT Instance
These are fair points to make since every client should be concerned about cost. The Internet Gateway in a VPC is provided at zero hourly charge (only charged by traffic passed) but the Bastion Hosts and NAT Instances are EC2 instances charged exactly as for any other instance.
The live environment spans two AZs so four running instances to support getting data in and out was difficult for the client to accept.
I came up with a sensible workaround based on previous experiences with SSH forwarding. I knew that the NAT Instances (regular EC2 instances in the public subnet running Amazon Linux) already ran an SSH daemon so I was sure that I could securely connect to instances in the private subnet via the NAT instance and could therefore get rid of the Bastion Hosts completely!
The configuration is fairly straightforward - there's more noise in the screenshots than anything else - yay Windows.
- The default username for all Amazon Linux instances is 'ec2-user', so we connect to ec2-user@ELASTIC.IP.ADDRESS

- Before we click 'Open', visit Connection -> SSH -> Auth and tell PuTTY where your PPK private keyfile is.
- If you only have the .PEM key downloaded from AWS, you will need to convert it with PuTTYgen. See here for details.

- The magic takes place in Connection -> SSH -> Tunnels:

- We have mapped a connection to 127.0.0.2:22 through to the private VPC subnet of 10.0.1.11:3389. I am using an SSH port on my local machine since Windows 7 binds to port 3389 on all local interfaces. I could've chosen any other local port number.
- Go back to the 'Session' menu (top of the 'Category' tree view), give the session a name and click Save.
- Now click 'Open' and can see we are connected to the NAT instance in the public 10.0.0.0/24 subnet:

- There's nothing obvious to say that the tunnel configuration has been successful - we need to right-click on the PuTTY title bar and select 'Event Log' for that:

- We can now launch the MS Remote Desktop client and point it at 127.0.0.22:

- Tada!
Final note - be sure to update PuTTY to 0.63 to benefit from improvements in the port-forwarding code, and to receive fixes for a bunch of security holes: http://www.chiark.greenend.org.uk/~sgtatham/putty/download.html
I have read this post. collection of post is a nice one AWS Online Training Course
ReplyDelete